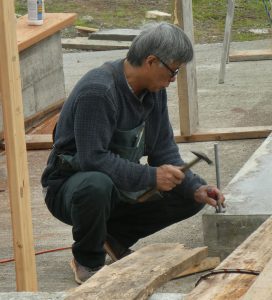
On completing the work of adding exterior base coat stucco, Sakaguchi-san measured the dimensions of door and window framing.
Measuring door dimensions.
He then returned to his shop to fabricate the doors and windows. During this time, he also constructed framing components for the tatami floor and various cabinetry. He selected the lumber pieces which consisted of redwood, mahogany and rosewood, then measured and did the rough cutting of components. He squared them by putting them through the joiner and planer. He had to let them sit for some days in his shop to see if they twisted at all. The ones that did, he put through the joiner and planer again. For some components, he had to repeat this a third time before doing layout for the joinery.
Rough cut door and window components.
After Sakaguchi-san finished the layout, he cut out the joinery and did the finish planing on the components, mainly by hand.
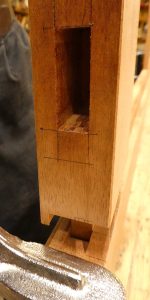
Cutting out joinery on a rosewood component for a bathroom cabinet.Close-up cutting out joinery.
Door and window components with cutout joinery.
Hand planing the components.
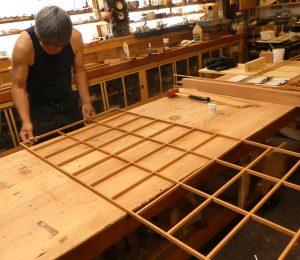
He then assembled the doors and windows.
Assembling shoji screen components.
Shoji door with wood panels.
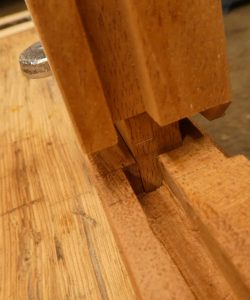
Detail door frame joinery.
Detail joinery.
Door frame partially assembled.
Detail hand- cut design in door component.
Assembling entrance door.
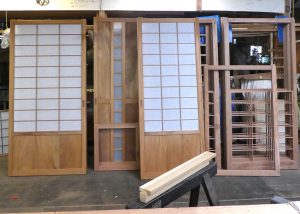
Shoji doors, some completed with shoji paper.Door for ofuroba (bathing room with wooden soaking tub).Detail hand-cut wooden handle for sliding glass and shoji doors.
When the doors and windows were all assembled, Sakaguchi-san transported them to the work site and installed them.
Installing front doorInstalling front doorInstalling yukimi shoji screens
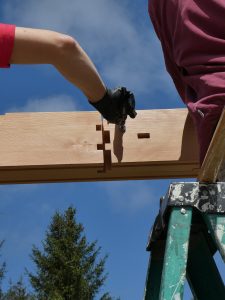
Sakaguchi-san cutting out post and beam joinery in his shop.
Hiroshi Sakaguchi is in process of constructing a building which will include a furoba (traditional Japanese bathing room with a Japanese wooden soaking tub), a small dressing room and half bathroom, a sauna, and a 6-mat tatami room to be used as a guest room or tea room. The building, 16’ by 26’, is being fabricated using traditional Japanese wooden post and beam construction. The basic floor plan was designed by the owners, then modified by Sakaguchi-san to fit the requirements of Japanese construction. Very high quality clear, tight vertical grain redwood and doug fir were procured by the owners– redwood for the main posts and doug fir for the beams. Sakaguchi-san shaped and hand-planed the wooden components and hand-cut the joinery in his workshop from late summer 2017 to early winter 2018.
Cutting joinery. Note layout markings done with sumi ink.Structural components for bathhouse.Detail joinery.Joinery connecting 2 boards to create long beam.
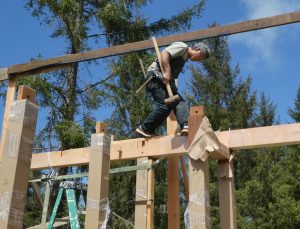
In late March 2018, the components were transported to the building site on the coast in Northern California. In late April (waiting for good weather), Sakaguchi-san drove to the site to assemble the building. The structure’s foundation is a concrete slab, and his first step was to layout the floor plan on the slab’s surface. He then secured bolts in the slab and structural framing was assembled. He was aided in the assembly by the owners, their son and daughter, and friends. The heavy structural beams were lifted up with an electric hoist. Temporary scaffolding was built to enable this process.
Beginning layout on foundation surface.Laying out floor plan on slab from drawing on plywood.Securing bolt into slab.Assembling post.Securing post.Fitting framing beam into post.Raising structural beam with an electric hoist,Connecting post and beam.Connecting a long beam.Pounding end of long beam to tighten connection.Connection has tightened and process continues until fit is perfect.Pounding beam into place.Beam walk.
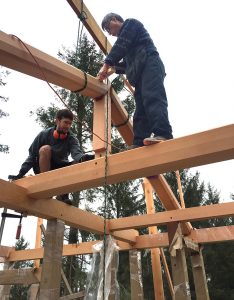
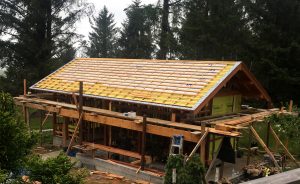
After assembling wall post and beam structure, the scaffolding was removed and new scaffolding put up for installing the roof structure. Roof structural components were then put in place.
Beginning assemblage roof structure.Adjusting roof ridge beam.Installation purlins and rafters.
After assembling roof structure, redwood ceiling boards were attached. The building will have an open ceiling exposing structural framing.